Since the introduction of the Echo to Eureka in patch 5.1, it became possible to much more easily level solo in Eureka than previously. Of course, Eureka itself is community-minded content, but feel free to use this information if you ever need to level solo.
For general information about Anemos, please check the Anemos page. You'll find maps, NPC and relic/gear progression information there.
Eureka leveling lies on some underlying principles you can check on the Solo leveling guide page, while this page provides some direct Anemos tips for newcomers.
General Guidelines
- Always keep up your food buff, Potion of Harmony, and Elemental buff. Use Eurekan potions on cooldown for healing.
- Levels 1 - 10: Focus enemies 2 levels higher than yourself; try not to finish your challenge logs unless it is the end of the week and you expect a reset soon
- Levels 10 - 15: Try to focus enemies 2 levels above you, but if there are issues maintaining the chain then go 1 level above you. Some challenge logs can start to be finished here.
- Levels 15 - 18: start doing fates more frequently, focus enemies 1 level above you cause here they hit harder (try 2 levels higher depending on your job and see if you're comfortable with it)
- Levels 18 - 20: focus on fates, try to catch the Pazuzu window once you're level 19. Finish any logs you need.
Starting Out
The first step is to buy Potions of Harmony(![]() ), and the cheapest level 60 food that has vitality and stats required for your class.
), and the cheapest level 60 food that has vitality and stats required for your class.
Once starting in the base, there are a few short quests needed to unlock the Eurekan Provisioner NPC, and you can then buy Eurekan Potions(![]() ) from them. Stock up with a lot of these.
) from them. Stock up with a lot of these.
Setting your stance right
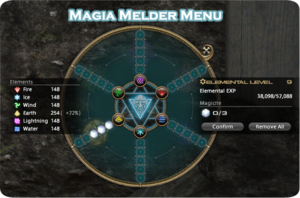
This can be done by right clicking the target info bar and selecting "Set magia board to offensive", using the command "/magiaattack", or by manually turning the magia wheel. You only have 5 spins that slowly regenerate, so try to not change elements too often. You can reset to 5 spins by interacting with the Magia Melder in the base.
Grinding logic in Anemos
Before starting any grinding, it is highly suggested to find an Anemos Elemental.
It is recommended to put a marker on one as you find it, so you can return to it later.
There will be quests at level 1,3,7, 13 and 17 - do them immediately upon unlocking, since each of the quest will unlock a magicite for you to use on magia melder. These will make your grinding experience much easier.
You can also attune to both Aetherytes ''The'' ''Windtorn Cabin'' on the eastern side and ''The Abandoned Laboratory'' on the northwestern side at elemental level 9 to make traveling across Anemos easier.
Whenever you finish a quest step, go to the Magia Melder immediately to equip newly acquired magicite to your wheel. Each magicite will make you significantly stronger.
Always focus on enemies 1-2 levels above you and kill them until you level up, then move along to the next level up of enemies. Try to always reach chain 30 before stopping, as that will give you maximum experience gain. While grinding, always keep an eye on your food, Potion of Harmony, and fairy buff. These are very important to keep refreshed, as they will add significantly to the experience you get while killing enemies. You can always check the solo levelling page for a reminder of the base experience gain logic in Eureka.
Challenge Log
As you kill mobs of a certain type, you will be filling out your Challenge Log.
It is advisable to keep the log incomplete for as long as possible. The experience gained from completing each log will scale significantly the higher level you are, and so it is worth more at higher levels. However, if you start leveling on a Sunday or Monday, for example, it makes sense to do the log as soon as possible before the weekly reset on Tuesday so that the experience isn't lost.
Fates (Notorious Monsters)
Fates also give good experience if they are around your level, and also give crystals which are needed for your weapon and quest progression (99 crystals are required for the level 17 quest). However, if the fates are to high or to low level, the experience gain from them will be extremely low - finishing the level 1 fate while you're level 10 gives less experience than killing a single level 12 monster.
From level 10, if there is a suitable fate (level 10-12) then you can join that for experience. If there is a train available, then you can involve yourself with that from levels 16-19 (primarily for crystals for both a full weapon and the level 17 quest).
The optimum way to do this while solo leveling is to spend most of your time solo grinding enemies, and then joining a group when a fate spawns.
If there is no train you can include yourself into, proceed with leveling yourself up to level 18-20 and then spawn lower level fates by yourself. They scale down to the number of people in the instance, and so they are quite easy to do and it won't take long to collect the requisite crystals.
Pazuzu NM
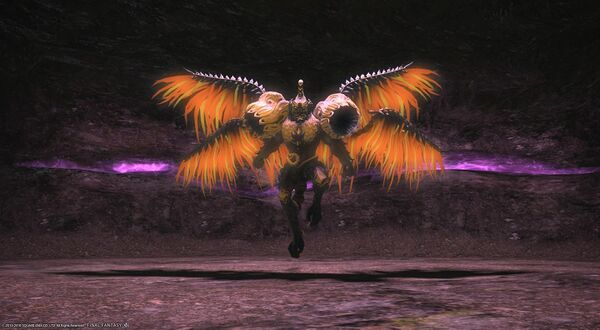
The last notorious monster of the instance is Pazuzu, which will drop Pazuzu's feathers for upgrading the weapons to the Anemos stage. This boss is doable solo in a closed instance or in any small/large group, just check the mechanics further below.
Pazuzu Feathers
For the last step of your weapon, you will need 3 Pazuzu feathers which are dropped from the level 20 Pazuzu fate. You will only get a feather from the fate if you are level 19 or higher. If there is a train you can join, it is likely you will end up spawning Pazuzu together. If not, then it is much easier to grind some lower level fates to collect more crystals, as the feathers can be bought at the base for 300 Protean Crystals each.
Pazuzu boss mechanics
- ''Cloud of Locusts:'' AOE centered around the boss (Get out of melee range)
- ''Plague of Locusts:'' Donut AOE centered around the boss. Move into melee range.
- ''Boon Void:'' Randomly targets a player and delivers a dodgeable mini AOE.
- ''Camisado:'' Tankbuster.
- ''Dread Wind:'' Three-part AoE. Will likely bring raid to low HP and will KO players without shields below Lv. 18. For this ability, switch to defensive stance.
- ''Gale Canon:'' Long distance rectangle attack extending from the front of the boss. Think Wave Canon from Zurvan.
- 'Dark Aero:'' Spawns Green clouds that randomly shoot out AoE using "Dark Aero"
- ''Tartarean Storm:'' Spawns tornadoes which need to be avoided
- Adds will spawn as well that need to be picked up, these days they are largely ignored but need to be tanked.
How to spawn Pazuzu
Pazuzu is a special notorious monster that can only spawn during Gales weather. 
In order to spawn Pazuzu, you have to kill level 25 Shadow Wraith mobs, which can only spawn during night time.
To track Pazuzu spawn, use Eureka Tracker. You can find a guide how to use Eureka Tracker here.
To give an example, in Pazuzu's case: we can see that we need to kill Shadow Wraith mobs, which have a little moon symbol near them, meaning these mobs can only spawn during night time.
You can see which weather is active or about to change on top of the page.
When to leave Anemos?
It is advised you leave Anemos at elemental level 20, as experience gains from mobs and notorious monsters in the next zone is malms ahead of what you can get from Anemos. If your goal in Eureka is to make relic weapon or relic gear, it's advisable to finish Anemos relic step before reaching level 25 in Pagos.


